25 Bathroom Organization Ideas

Imagine your tub filled with hot bubbly water and a glass of bubbly waiting for you to sip whilst you indulge in your peaceful and relaxing bathroom.

Relax In Your Bathroom

Photo credit: theswedish via sxc.hu

But do you open the door to your bathroom and see every flat surface covered in lotions and potions and wet, damp towels?

Don’t despair – a bathroom oasis is not that difficult to obtain.

The main clutter points in a bathroom are:

  • the sink and vanity unit,
  • the tub surround,
  • the shower cubicle,
  • towels,
  • the medicine cabinet and
  • any drawers you may be lucky enough to have.

Let’s take each one at a time and think about some bathroom organization ideas that could help achieve your perfect relaxing oasis.


First the organizing rules

But first let’s remember the overriding organizing rules to guide you through each area:

Declutter first – throw away anything that you do not need or love, in other words those lotions you haven’t used in the last 6 months or that rusty old razor. When in doubt, throw it out!

Check the expiration dates on cosmetics – they go off you know. This great post from Beauty Top To Toe will tell you all you need to know about how long you should keep make up for.

Relocate – duplicates by moving them to your excess storage area (this may well be under your sink if you have room) or stuff that doesn’t belong in the bathroom (eg, I had loose change in mine – why??!!).

Group like items together – there are plenty of different things to be found in a bathroom, such as mouth care, hair care, skin care, cosmetics and nail care items to name just a few. Make sure each group is stored together to give easier access to your items and also so you know when a certain item is running low and needs replacing.

Plan out how to use your available space in the most efficient way – this may involve choosing the most useful place for each group of items to be stored or adding organizers to help ‘create’ extra space.

OK, OK, I’m getting there – here are the ideas for how to organize these key areas of your bathroom:


THE SINK & VANITY UNIT

Keep in mind your daily routine when organizing your sink area. Things that you use daily should be stored within easy reach. This maybe in a pretty dish or basket on top of the counter, in the top drawer of your vanity unit or corralled in a plastic bin under the sink.

Things that you don’t use very often should be stored in the less accessible places. Either on high shelves or at the back of cabinets.


1

Attractive countertop storage

Apothecary jars, glass tumblers and other glassware are ideal for your countertop or on a shelf above the sink. They are stylish so can be left out in the open and you can mix and match shapes and sizes, from low bowls to wide mouth jars to suit whatever you want to store.

Items such as cotton wool balls, soaps and bath salts all look attractive if left out and the glass jars offer easy access as well as allowing you to see when things are running out.

Photo credit: houseonthehillblog.files.wordpress.com via Jillian on Pinterest

You should always keep makeup brushes upright in a tumbler to stop them from dusting up your drawers.

As well as glass containers, you can also choose attractive baskets to leave out on the counter. If you ever want to clear the counter, perhaps if guests are coming, you can always just put the containers inside the vanity.

I would probably avoid plastic jars if you are going to leave them out on show as they are not the best look, but you should be able to find a wide range of affordable glassware online or in second hand stores.


2

Be original with your containers

To keep your bathroom storage interesting, look for unique containers to corral your items. You can then leave them on display or keep them inside cabinets. You can pick up inspired pieces when you see them at yard sales, on offer in home stores or at online auctions for example.

Ideas include metal sand pails, kitchen platters, cottage style jugs and mugs, garden planters, wicker baskets and tiered cake stands.

You could also make your own tiered storage by sticking two different sized dinner plates to either end of a candlestick.

Photo credit: westelm.com via Melissa on Pinterest


3

Not much counter space?

If you do not have much counter space around your sink, think about installing a shelf above it or choose a mirror that has a built in ledge. You could even hang an attractive bucket next to the sink which would easily hold all the items you use on a daily basis.

If you’re into DIY, why not consider installing some shallow drawers or cubbies into the wall space. Find the gap between the drywall studs and make use of it.

There are also plenty of sink type organizers available to help give all the standard bathroom items a home. These include toothbrush holders, soap dishes etc. And how about a piece of corkboard covered with fabric on your wall to hang up your jewellery?
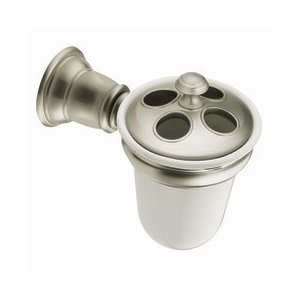
Wall Mounted Toothbrush Holder


4

Plumbing issues?

As I discussed in my ‘how to organize under the kitchen sink‘ post, if your sink is mounted into a cabinet, organizing underneath may be tricky due to the plumbing fixtures. If your sink is on a pedestal, your problems are increased as you have no hidden space, although you could fit a ‘skirt’ to give an area where cleaning products or extra toilet paper could be stored neatly.

If plumbing pipes are your problem, pretty baskets or buckets to corral similar items are the cheapest solution. This way you can pull out the basket for whatever you are doing, say your hair or nails, have everything to hand on your countertop and then put it away quickly and neatly once you are finished.

For organizers designed with plumbing fittings in mind, you can find stepped shelves that are narrow at the top and wide at the bottom. There are also others on brackets that slide in and out. These work well as they give you easy access to items stored at the back of the cabinet.

Photo credit: marthastewart.com via Katie on Pinterest


5

Under modern sinks

Modern sinks and countertops tend to float out from the wall. Skirts that are suitable for pedestal sinks do not tend to look good in this environment. Instead you need to make use of the floor space with attractive storage options or tools.

Large wicker baskets packed full of fluffy towels is an easy option but my favorite is to use multiple wooden magazine racks and to stack about 4 rolled towels on each one. There’s a picture here from BHG.com:
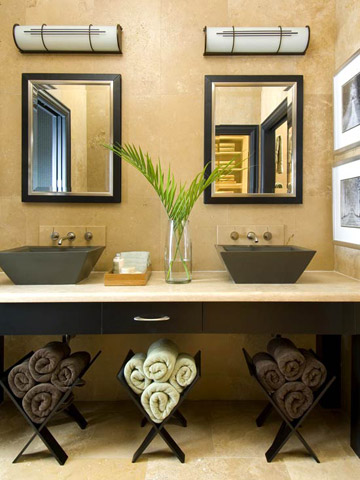
Towel Storage by BHG

You could also just use the space to store a pretty trash can or a step stool if you are making use of your vertical space with high shelves above doors and windows.


6

Small cabinets

If your cabinet is quite tight for space, organizers such as shelf expanders, slide out organizers and lazy Susans are a good idea as they offer easier access to all areas of the cabinet. They can easily double the useful space within.

Don’t forget the back of the vanity doors too as they are ideal for storing items such as hairdryers and flat irons which can be hung on hooks. You can also get over the door hanging racks, shelves and baskets to make the best use of the space.

Photo credit: familyhandyman.com via Elizabeth on Pinterest

Try not to waste the space at the side of the vanity as well if it is not fitted wall to wall. Fix a towel bar or shelves to it.


7

No vanity unit?

If you don’t have a vanity unit in your bathroom, consider buying a freestanding unit instead or repurposing a dresser or bookcase that you no longer use or have picked up at a yard sale. Just use polyurethane to protect the wood from moisture damage.

You could also use a chest or bench seat. These are ideal for storing larger items such as towels or your extra supplies of toiletries. These are nice to have on hand if you have the room.

Photo credit: ana-white.com via Adrienne on Pinterest


8

Lots of bathroom users?

If your bathroom has a lot of different users and if you have the space, you should consider using a shelf or basket for each family member. That way everyone will know where their items are and where they should be returned to.


9

Cleaning supplies

Under the sink is a great place to keep a caddy of cleaning supplies. Keeping them close at hand, perhaps with a hook for cleaning cloths on the back of the door, makes it easier to have a quick wipe round every day, reducing the time taken for a big clean later.


THE BATHTUB


10

The tub surround

Depending on how much of a surround your tub has, will determine how much you can store there and whether you need to look for alternative storage options.

If you have the room, then keep your lotions and potions grouped together to look neater, either in chrome racks or baskets, in attractive bins or just on ceramic platters. Maybe use a few chrome hooks to hang your wash cloths, mitts and bath sponges.

Photo credit: citified.blogspot.com via Samantha on Pinterest


11

Use the wall

If you are short on space, one idea is to use the wall. Most wall mounted solutions use suction cups to stick to the wall so they are easy to mount and easy to move about. Designs include racks and shelves which are ideal for shampoo, conditioner, soaps and shaving accessories.

But why not take inspiration from your kitchen organization and mount a sturdy metal rod (often used for utensils or pots and pans) on the wall along the length of your bath? Use the included hooks to hang individual racks or bins to corral your items like this one from BHG.com.
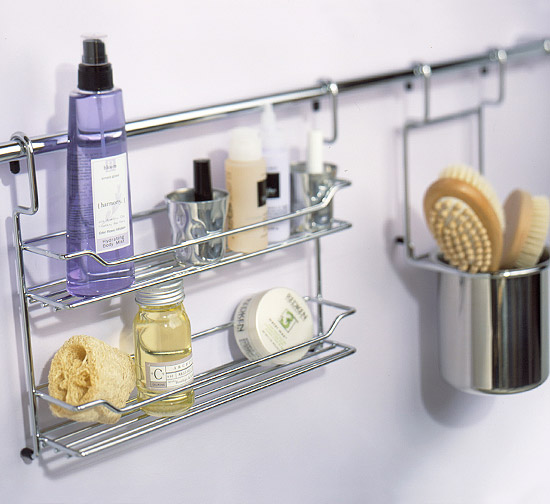
Kitchen Hanging Rod for Bathroom from BHG

If your tub is boxed in you could also use a chrome shower curtain tension rod to hang things on.

A more complicated but integrated wall solution is to use the space between wall studs to create a recessed storage area.


12

Over the tub

An alternative to wall storage is to use an over the tub rack. These balance on either side of the tub and can be positioned anywhere along the length. I particularly like this one by Umbra made from bamboo and chrome that has a soap holder, book support and wine glass holder. Now that’s what I call a relaxing soak! It costs about $40 (check current price).
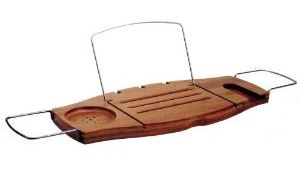
Bathtub Caddy


13

Built in

If you want a minimalist look, why not build some bathroom storage into your bath itself. This would be perfect for a small bathroom.

Photo credit: bornrich.com via Angie on Pinterest


14

Use uniform bottles

Wherever you store your bathing supplies, you may find that just lining up the manufacturer’s bottles of bath salts and body wash may not look that attractive. So instead it may be worth decanting your bath products into uniform bottles.

Photo credit: marthastewart.com via Bronwyn on Pinterest


15

On the floor

Fresh fluffy towels add a cosy, comforting touch to any bathroom. If you have the room, keep a stock by your tub in a huge wicker basket.

Photo credit: worldmarket.com via Justineh on Pinterest


THE SHOWER CUBICLE

Another notoriously messy place, the shower cubicle, is often home to a collection of half empty bottles of shampoo, body wash etc. There may also be surplus bottles, soaps, shaving supplies and even cleaners laying about. But why? There are many shower organizers available.


16

Wall suction

For a quick to install solution look no further than the wide range of caddies, baskets and other organizers that simply stick onto your shower wall. They come in a range of shapes and sizes so one or a few of them are bound to fit your needs. His and hers comes to mind.

Oxo Good Grips Shower Caddy


17

Hanging

Another option is a hanging organizer. You can find those that hang over the shower head, over the taps, over the door or shower rail as well as from the ceiling. Wherever you fancy grabbing your supplies from, you can find an organizer to fit.

Photo credit: Courtney on Pinterest

How about this shower caddy octupus which, if you ask me, is just plain weird – not to mention expensive at $35 each.

Photo credit: sleekidentity.com via Lizzie on Pinterest


18

Built in

As with the sink and the tub, you can also build recessed storage in between the studs on your shower wall. Install shelves or a rod or whatever takes your fancy.

Photo credit: houzz.com via Lauren on Pinterest


19

Tension pole

For a bit more stability than perhaps is offered by suction cups, tension pole organizers expand to fit perfectly in the space between the shower floor and ceiling. Often coming with 3 or 4 shelves or baskets, they are ideal to store all of your shower supplies conveniently in the corner.

This one from OXO has received rave reviews despite being somewhat pricey at around $130 (cheaper on Amazon). If that’s a bit expensive, they also do a nice 3-tier shower caddy for about $30 that hangs from the shower head and uses suction cups for stability (see #16 above).
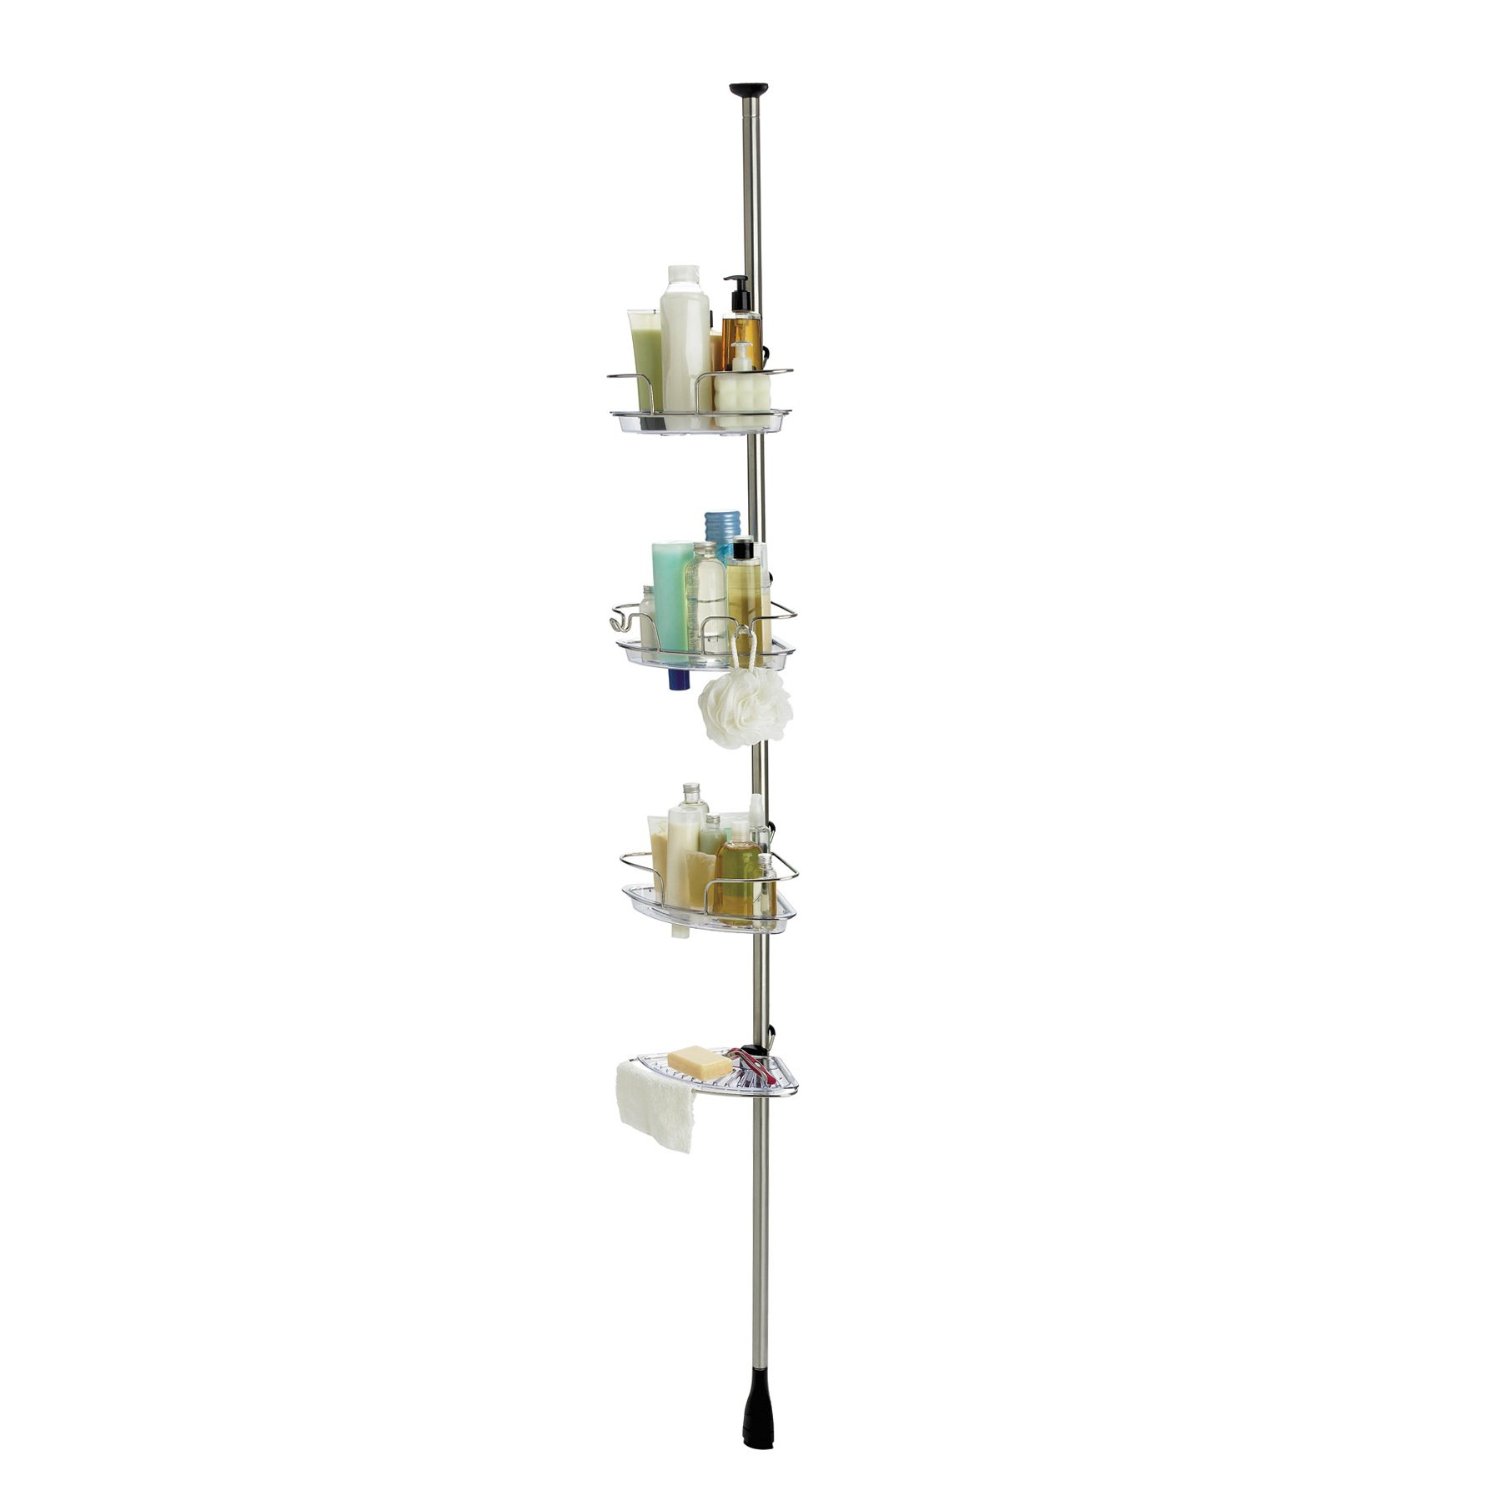
OXO Good Grips Shower Tension Pole


20

Freestanding units

If you have a large enough shower with a flat base, you can find free standing shower organizers that fit neatly into a corner. Look for ones with rubber feet to prevent sliding.
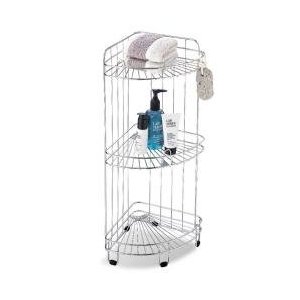
Freestanding Shower Caddy

Tips:

  • Limit the number of toiletries you actually keep in the shower cubicle. One bottle of shampoo will do – keep your spares in the vanity unit.
  • When looking at shower caddies, choose those that are quite deep so that your shower supplies don’t slip out.
  • Also look for those that are made of wire mesh or have large drainage holes to save you having to empty stale water out every day.
  • For something really functional, organizers that hold bottles upside down are perfect for getting out that last bit of shampoo or whatever.


BATHROOM TOWEL STORAGE

I love big fluffy fresh towels don’t you? The soggy, used ones – not so much!

But it seems to me that unless you wash your towels daily, you need somewhere to store both – fresh and soggy.


21

Fresh towels

The fresh ones are easier to store. They can be rolled or folded and stored in any number of ways. Ideas include wicker baskets, high racks above the sink or tub (like in hotels) where you can stack them or hang them, towel ladders and wall mounted magazine racks.

Photo credit: myhomeideas.com via Amy on Pinterest

My favorite unusual idea though is to use a wine rack to hold rolled towels.

Photo credit: sundancecatalog.com via Elise on Pinterest


22

Soggy towels

Those towels that are in use and potentially soggy are a different matter. Folded or rolled they are not going to get dry and there’s nothing worse than drying with a damp towel.

So the first thing to make sure is that you have enough hooks or racks for each family member. That way each towel has its own drying space.

You then need to know whose is whose. I’ve come across a few ideas including putting a piece of different colored ribbon on each one as well as my favorite – putting a framed picture of the person above their hook. This looks very cute in a kids bathroom.

Obviously there are tons of towel hooks, racks and rails to choose from but here are some fancy ideas I’ve noticed whilst researching these ideas: shower curtain rods that have a double rail – the second being for towels, door handles mounted to the wall (not just knobs but the whole plate too), faucet tops fixed into a dado rail, rope towel rails, upside down wooden hangers and a coat stand. You could also just hang towels on pants hangers from your shower curtain rail if it’s strong enough. I’m using this idea for my bath mat after seeing the idea at Joyful Homemaking.

Photo credit: notjustahousewife.net via Erin on Pinterest

Photo credit: marthastewart.com via Daffny on Pinterest

Photo credit: junkcamp.blogspot.com via Lindsay on Pinterest


THE MEDICINE CABINET

OK before we start with ideas as to how to organize the medicine cabinet, let’s be clear that medicines should not be in it. Bathroom = humidity and medicines don’t like humidity so get them out of there!

The bathroom is a high traffic area where storage space is limited. As such, you should only use premium space, such as the medicine cabinet, for items you use regularly. If you like a clear countertop, the medicine cabinet is the place for your everyday items. Here’s how to make the best use of it:


23

Use every square inch

You can do this with suction cup and/or magnetized organizers.

Small flat backed cups, bins or racks are quickly mounted to the inside of the cabinet door or the side or back walls via their suction cups. These can be used to hold combs, brushes, toothpaste and the like. Just be sure you can close the door properly.

Magnetized organizers are more readily available in the smaller sizes needed for the inside of a cabinet so these can be a better idea. Just glue a pre-cut sheet of galvanized steel to the interior and then buy some magnetic hooks or glue some magnets onto small plastic containers with lids and you’re away. Use the hooks to hold scissors etc and corral hair or nail accessories in the plastic tubs.

Photo credit: marthastewart.com via Kari on Pinterest

Magnapods are a brand that specialize in this sort of thing and they have a whole range of magnetic cosmetic holders including toothbrush holders and nail polish organizers.


24

Be efficient within

Choose a cabinet with removable shelves. That way you can fit all your tall bottles in at the bottom and corral small accessories in pots or tumblers at the top.

Buy your cosmetics in bulk or larger bottles but decant them into smaller bottles so that you can keep your daily supplies in the cabinet. Store the original larger bottles in the vanity unit.

If a few members of your family are using the medicine cabinet, aim for one shelf each so that you can each take responsibility for your shelf.


BATHROOM DRAWERS

Drawers have a tendency to turn to chaos because their insides are unseen and because the items within move about over time and merge together into a jumbled mess. As such the golden rule of your bathroom drawer is not to let things overlap. But how do you achieve this?


25

Divide & conquer

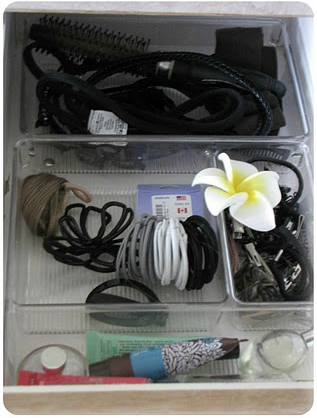
Take heed from your kitchen drawers and invest in or make some drawer dividers. Silverware holders, multi-part expanding drawer divider sets, little baskets or interlocking bins, small margarine tubs or even homemade cardboard dividers will do the job admirably.

How about baby food jars to contain hair bobbles, muffin trays, egg boxes or even plastic take out containers? Glass bowls, ceramic plates … the list is endless.

Just remember whatever containers you opt for need to be small enough to fit into the drawer but large enough to hold a particular group of items.

Makeup bags could work if you have a few small ones – one for each group of items. The trouble with them is that they tend to be bulky and you can’t easily see what is inside.

Dividing your drawer will allow you to categorize your beauty products, making finding them and returning them to their home much easier.

Check it out in practice here at Clean And Scentsible.
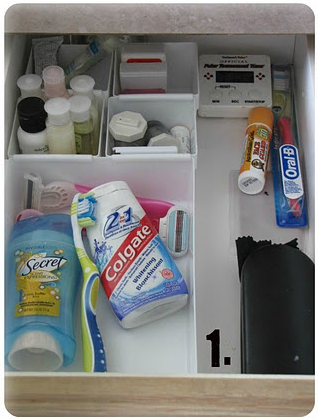
Bathroom Drawer Organization by Clean And Scentsible And Another

Just remember to use a thick plastic liner at the bottom to protect your drawer from spills and stains. A rubber mat is ideal if you are using glassware in the drawer as it will stop things sliding about.


Implement one of these bathroom organization ideas today

Your bathroom may sound like a small room to get organized in one session, but when you break it down into these problem areas, you begin to see that the task is bigger than you first thought.

As such make a start – pick one area and declutter it today. When you see what you’ve got left to organize, I hope some of these ideas will help you take back control and leave you with a bathroom where you can occasionally take some time to pamper yourself.

If nothing else just knowing where your bathroom items belong will probably make you put them back as you go, helping to avoid long drawn out cleaning routines later on.

26 Ideas For Lego Storage Containers

Where IS your Lego? Completely out of control taking over your entire house or neatly stored and organized in your kids room?

Perhaps a better question would be, where haven’t you FOUND Lego? Under foot, in the vaccum cleaner, down the side of the couch, in the washing machine, in the car, in your purse, in your shoes, even in the oven?

Pile Of Lego

Photo credit: musicmoon@rogers.com

I know mine is in various places around the house – broken down into a big bin, in various boxes with bits of sets, as various completed displays and as various half completed ‘things’.

The trouble is my son has left me in doubt that he wants the Ninjago Fire Temple for Christmas, so our collection is about to grow by 1174 pieces. Aagh.

As such, Lego storage containers and ideas are on my mind. Having spent days trawling the internet for what other people do I give you below my findings.

If your collection is out of control, your Legos are seemingly multiplying on their own, you have a Lego fan whose collection needs to be kept safe from a younger child or you just have a Lego storage dilemma, check out the ideas below and take back control. I hope they help! Please also add your own ideas in the comments below.

Which solution will work best for you will depend on:

  • how many pieces you have,
  • what type they are (sets or random blocks),
  • what space you have,
  • what budget you have,
  • how portable the collection needs to be and
  • how your kids like to play.

After reading this hopefully you will at least have some ideas about what may work for you.


1

Large Plastic Storage Boxes

Our main random brick collection is housed in a large plastic storage box. But this is less than ideal for us.

One problem is that it is quite heavy to carry up and down the stairs as my son likes to build in the family room. Another is that it is hard to find anything in it without tipping it all out. And lastly, with the more recent additions to our collection of ‘sets’ rather than random blocks, we need some way to keep them separate.

However, for some, large boxes will be fine. Some Lego collections even come in plastic bins so you may not find the need to move them at all.

Alternatively LegoEducation.us has some nice storage bins – a shallow bin with lid for $9 or a deeper bin with lid for $18. For both of these you can purchase a sorting tray which will hold special pieces separately on top. These cost $5.95.

Lego Education Shallow BinLego Education Deep BinLego Education Sorting Tray

Or how about this set of 4, 21qt plastic boxes from Iris. For around $42 (check current price), you get four boxes in pretty colors. They measure 11″ x 14″ x 16″ and can also be bought individually.

Iris Set of 4 Plastic Boxes

For a non-Lego style option, which brings the price down a bit, this set of 6, 18qt standard boxes from Sterilite are a good buy at around $48 (check current price).

Set Of 6 Sterilite 18qt Boxes

Tip: Save Money

Check out what plastic tubs you already own to save money. See through versions are best but you could label them otherwise.

Tip: The Blanket Trick

If you do plan on keeping your ‘big box’ of Lego, Joyful Homemaking has a great tip for ‘contained’ play and easy scooping up:

“Dump them on a blanket so they can see better when they are picking pieces to build with, and yet can easily be folded up to dump the Legos back into their container.”

I’ve been using this ever since I read it as it makes the Legos portable between rooms too.

Tip: Stack Your Bricks

Whilst not exactly a storage container, stacking your Lego bricks is a good way to store them whilst keeping them organized in a large container.

It is a lot easier to keep track of smaller pieces, such as those teeny, tiny, 1×1 bricks, by stacking them into a tower.

If you do that for a few colors and sizes and then position them next to each other on a base board, they will gain strength in numbers.

Just remember to offset the bricks so that you can take them apart easily. For tons of information on stacking Legos, check out Evil Mad Scientist.


2

Small Plastic Storage Boxes

Smaller boxes avoid most of the problems of bigger ones as they are more portable and have less contents to wade through.

Plastic shoe boxes are ideal for housing your collection once it is sorted, by color or collection for example. Have one box for Star Wars, one for Toy Story etc etc.

Small boxes can be picked up cheaply at your local dollar store and are easy to stack under tables, on shelves or in closets.

Check out this 12 pack of 6qt boxes (shoe size) from Sterilite. The set costs around $24 (check current price) and the boxes measure 14″ x 8″ x 5″.

Sterilite 12 Pack 6 Qt Boxes

Or for a more ‘Lego’-centric storage idea, have a look at these Lego brick storage boxes. Aren’t they cute? They’re from A Place For Everything which is in the UK unfortunately. They are not cheap at about $34 each for a box measuring 19″ x 10″ x 4″.

Lego Brick Storage Box

For colorful but more affordable sets of different sized small boxes, consider these CD, Organizer and Document boxes from Whitmor. The CD boxes measure 12″ x 5″ x 6″ and the others are a similar size. All 3 sets cost around $13 (check current price).

Whitmor CD BoxesWhitmor Organizer BoxesWhitmor Document Boxes

Tip: Kids need to move bins about easily so don’t let them get too heavy.

Tip: If you want to ensure a quick and easy clear up after play time, choose open bins.


3

Stackable Storage Boxes

Another option from LegoEducation.us are their stackable storage bins for $3 each which do not have lids, but stack whilst allowing easy access to pieces from the stack.

Lego Education Stackable Bin

Here’s the idea in use on Pinterest.com.

Stackable Storage from Pinterest

Photo credit: Katie

How about a stackable bucket? The Bucket Boss Super Stacker was originally designed as an organizer for screws, nuts, bolts, washers etc but this 4″ deep, 10″ diameter bucket has 4 compartments ideal for sorted Legos. The design is stackable and has a handy handle for little hands to carry about. Each one costs around $9 (check current price).

Bucket Boss Super Stacker


4

Shallow Plastic Bins For Under The Bed Storage

Short, rectangular containers with a hinged lid (so it doesn’t get lost) are a great idea for Lego. Being shallow they are easier to ‘wade’ through, so your child can get to the bottom of the box more easily. They can be stacked and/or slid under a bed for easy storage.

If you plan on under the bed storage, why not choose boxes with castors so they slide easily and those with split lids that can be lifted half way without having to slide the whole box out.

This set of 3 from Organize.com costs $71.49. They measure 6″ x 39″ x 20″.

Underbed Storage Box By Iris

How about making your own like this one from Daniel Sicolo?

Daniel Sicolo Under Bed Lego Storage


5

Plastic Kiddie Pool

For the ultimate in shallow but BIG enough storage, throw all the Lego blocks in a plastic kids pool. They can ‘wade’ quite happily and easily find the bits they are looking for whilst at the same time keep all the pieces contained with the raised sides. They can even sit in the pool to play. And when it comes to putting it away, just push it under the bed (use bed risers if need be).

What a great idea from the Joyful Homemaking commenters.


6

Lego Bins

There are various colorful styles available of these Neat-Oh! Lego ZipBins. They are each dedicated to a specific type of Lego (Racers, Star Wars, City, Duplo etc) but can obviously be used for any type of Lego. They are affordable at about $15 (check current price) and double up as a toy box and playmat with different features depending on the style. Various sizes are available.

Neat-Oh Lego Storage

Unzip the bin to reveal the playscape for playing. Once playing has finished, collect all the bricks up and store them in the strong and portable bin. They can be stacked, wiped clean, hold thousands of bricks and have a carry handle making them easy to move about. They also fold down into a small flat pack when not in use.

Watch this 10 second clip to see how they work:


Alternatively for around $12 (check current price) you can get 3 bright and colorful fabric, zippable organizers made by Lego. They are quite small so only really suitable for travelling or for smaller pieces in the bedroom (say minifigures). When not in use, they nest inside each other or store flat. There is a clear window at the top to see through. They measure: small = 3.5″ cube, medium 4″ cube and large 4.5″ x 9″ x 4.5″ rectangle.

Lego 3 Piece Organizer


7

Lego Buckets

Here’s another official Lego product – a bucket that cinches together at the top with a drawstring – and costs around $16 (check current price). It is ideal for storing toys but also with the carry handle and secure closure it is ideal for travel. It stores flat when not in use. The only downside is that it’s not very big being only 8″ in diameter.

Lego Cinch Buckets

Or how about these toy buckets from LegoBags.com? They have a main bucket-shaped compartment with surrounding outer pockets to keep smaller items out of the main area. It comes with handles making it easy to move about and costs $24.

Lego Bags Toy Bucket


8

Plastic Storage Box Systems

Moving on from just a collection of random storage bins, come integrated systems that hold and organize your boxes in some semblance of order.

The Ikea Trofast system came up time and time again as being ideal for storing a large Lego collection. The wooden side panels have grooves that the plastic storage bins hang from. You can buy bins in different sizes – perhaps shallow for random bricks and deep for sets, instructions or completed works.

Check it out in use (courtesy of Not A Stepford Wife).

Legos In Trofast System  Legos In Trofast System 2

Here’s another picture from I Heart Organizing.

I Heart Organizing Lego Trofast Storage

We actually use this system for all my son’s main toys. The reason I don’t use it for Lego is that we bought two tall systems, which he can’t reach the top of and also we bought the deep boxes. So avoid those configurations if you want to use it for Lego.


9

Plastic Case Systems

For Lego specific cases, take a look at this workstation and storage unit from Iris. For around $54 (check current price) you can organize your Lego collection by color, size or set in the 6 project cases that can then be filed away neatly in the plastic display unit.

Iris 6 Case Workstation

Your kids can grab one or more of the cases to take with them to the living room or wherever. There are also two base plates on the top of the unit which can be used for play or display purposes.

You can buy the cases individually from Lego for $10 each so this is a great price for the stand combination. The cases are 10″ x 10″, have snap tight closures, a built in handle and a cool graphic.

For a smaller collection, you can also find a 3 case workstation for $33 and 4 cases but no station for $33.


10

Toy Organizers

Generic toy organizers can work well with Lego. This one from Little Colorado costs around $97 (check current price), but comes with 3 shelves and 9 plastic bins with lids (6 qt, ie, shoe box size). It is ideal for storing and organizing your collection of Legos.

Little Colorado Toy Organizer

How about a super pricey option at $715! It would hold a large collection though. This 30 tray mobile storage unit from Jonti-Craft comes with 30 cubbie trays in 5 colors and is easily moved about on the built-in casters. Each tray measures approx. 5″ x 9″ x 14″. Alternatively you could opt for their 10 tray unit which only costs $337 – ONLY!

Jonti-Craft Mobile Storage Unit


11

Plastic Drawers

Plastic drawer sets are easy to find online or in your local home store. They come with deep or shallow drawers, with wheels or not, and come in various sizes. Those on wheels are easy to move around to help during play time and clear up.

They make ideal Lego storage solutions. Perhaps you could choose a design with shallow drawers on top for small pieces and deeper drawers as you go down to hold bigger pieces. Being spread across 5 drawers makes the pieces easier to find if organized or labelled in a clear way.

Using shoe storage boxes within the drawers can help to sort the bricks out and makes it easier to remove one batch from the drawer set to play with. This image from Capturing The Days shows you what I mean:

Capturing The Days Lego Storage

Nice drawers aren’t cheap unfortunately. This 7 drawer mobile cart from Sterilite will set you back about $100 (check current price) but it looks very useful with it’s different size drawers. The overall size is 14″ x 12″ x 39″.

Sterilite 7 Drawer Cart

For a portable, multi colored rolling cart with 10 shallow drawers, check out this Advantus Cropper Hopper that costs around $54 (check current price). Each drawer measures 11″ x 15″ x 3″ so would be ideal for sorting and storing a medium sized collection.

Advantus Rolling Cart

There are also other configurations available: 6 drawers (2 deep, 4 narrow), 15 drawers (5 deep, 10 narrow), 20 drawers (all narrow).

Here’s a picture of one in use from Creative Homemakers.

Creative Homemakers

Smaller drawer sets, such as stacks of 3 that you might otherwise put on your desk, are an alternative to mobile drawer carts. They can be stored in a cube organizer along with Lego displays, baskets for mid-build pieces, to be sorted piles and instruction booklets.

You can see the idea below from Little Red Hen. My only concern would be that the little ones can reach the drawers and that they don’t topple over.

Little Red Hen Lego Storage

They cost around $33 for 4 sets of 3 drawers (check current price).


12

Compartmentalized Plastic Boxes & Cases

Plastic cases with internal dividers and handles don’t take up as much room as drawers and they can be just pulled out from the closet and dragged to wherever your kids want to play. When play time is over, just close the lid and return to the closet. The internal dividers prevent the pieces from becoming mixed together whilst being moved about.

Whether originally meant for fishing tackle, nuts and bolts, beads or any other craft type storage, boxes with individual compartments are perfect for keeping ‘special’ pieces or minifigures separate from the main collection. They are great as you can see everything at once and they can be found at big box hardware stores.

Some such boxes come with fixed compartments, others have moveable dividers. I personally prefer the latter so I can customize the box to fit my needs. They come in various sizes so check out your collection and buy accordingly.

Check out how tackle boxes have been used by RemarkablyDomestic.com.

Plastic Case By Remarkably Domestic

You can buy such cases from Plano for nearly $7 each (check current price). You get a case which you can divide with 4-24 compartments. It is ideal for smaller special pieces.

Plano Case

Alternatively this parts organizer by Stanley costs around $13 (check current price) and has configurable dividers that you can remove to customize your own design. The special lid keeps the compartments and contents in place.

Stanley Parts Organizer

You can see something similar in use here at JasonBartholme.com.

Stanley Organizer In Use


13

Mini Drawer Cabinets

Using a similar micro-separation and organizing idea to the compartmentalized cases, drawer cabinets with plenty of mini drawers are ideal for keeping small collections of special Legos separate.

The Akro Mills 44 Drawer cabinet costs around $33 (check current price) and gives you 12 large and 32 small drawers to efficiently categorize the special pieces in your Legos collection. Each drawer has a finger grip and rear stop tab to prevent spills so this cabinet is ideal for little fingers.

Akro Mills 44 Drawer Cabinet

For a complete wall system, take a quick look at the Akro mills tacking bins – which are a great idea for an industrial look. The mounted wall panels make adding and removing bins easy. There are different sizes of break-resistant bins available. They come in red, yellow or blue and have finger grips to make handling easy. 32 small bins and the necessary wall panels cost about $73 (check current price).

Akro Mills Wall Panels

For a much bigger option check out the Jumbo Crate by Brikcrate.com. It costs a lot at $387 but it does hold 3 cubic feet or about 18,000 components. It is made of natural pine and measures 4′ x 4′ x 10″. It also comes with a table and 480 labels so you know what is in each drawer. There are 4 different combinations of drawers available from all big to a mixture of small and big.

JumboCrate

Tip: If you end up using a drawer system where the drawer fronts are opaque so you cannot easily see what is inside, you will need labels. Check out this free download from Mrs Jones for 2 pages of specially designed Lego storage labels.


14

Matt’s Mushroom Bins

Why not use those square plastic tubs that packaged mushrooms are often sold in. They’re cheap, have a flat bottom, they nest and are stackable, they’re clear and they have easy to grab outer rims. You can use more as your collection grows and they’re disposable if one breaks. They’re easy to lay out, easy to fill and come in various sizes. My only concern is that without lids, they may not be ideal for younger kids. From 15 cents each though they’re very cheap. You can order large quantities from Horseshoe Bend Ranch.

Mushroom Bins


15

Old Luggage

Do you have any old suitcases or other luggage that you no longer use? If they have wheels so are easy to move around, consider using them for your Lego collection. Store instructions in the outer pockets, building plates in the inner pockets and fill the main body with the bricks. Stand them up to fit nicely into narrow spaces or lay them flat for under a bed.

This great idea is from a commenter at JDOrganizer.


16

Bongo Bags

Bongo bags are great for Duplo or Lego. They can be partially collapsed to fit into any shelving units you currently own and they are available in various colors so you can organize and store your bricks in a matching colored bag. A set of 4 in various colors and sizes costs around $16 (check current price). The largest one measures 15″ x 17″.

Bongo Buckets


17

Ziploc Bags

If you have a small collection, you could use Ziploc bags to keep the different colored bricks separate. You could then file all the bags in one plastic bin. The only trouble with this is that it is not very accessible to kids when they want to play.

A better use for Ziploc bags is to store ‘sets’. Get rid of those big bulky boxes that they come in – that are 5 times bigger than necessary for the number of pieces – and keep the pieces with the instructions and even a picture cut from the box, in a Ziploc bag.

See how it’s done over at ASoftPlace.net.

A Soft Place Lego Storage In Ziploc Bags

You could also use one to keep all the various instruction booklets together and safe.


18

A Lego Wall

For an off-the-wall (!) idea, check out these Lego walls over at ‘Dukes And Duchesses‘ and ‘Milk And Cookies‘.

Dukes And Duchesses Lego Wall
Milk And Cookies Lego Wall


19

Socks LOL!

Why not buy some different colored socks and use them to color co-ordinate your collection. Again this isn’t ideal for a large collection or particularly for kids but I thought it was a creatively bizarre idea from WikiHow.com.


20

Like A Lego Store

If you’ve got as much Lego as the Lego store, this is how they do it. I’m not sure it makes the best use of space but it looks quite good and the lower levels would give easy access to the next brick. I’m not sure about tidying away though.

Lego Store

Photo credit: sylvar


21

Lego Sorter Boxes

As well as just storing your Legos you may want to sort them. You can do this manually in a number of different ways (see below) but a couple of Lego storage boxes actually do it for you.

Box4Blox won the best new organizing product of the year. It not only stores your Legos but organizes them too into pieces of different sizes. You tip all the Legos into the top tray, give it a shake and the smaller pieces fall through the grids to find their correct home in one of the bottom 3 trays. It costs about $40 (check current price).

It is a 10″ cube so is only suitable for about 1600 bricks. After that you’ve outgrown it. There are also a few niggles such as the sections not snapping together and there being no handle so it’s not very portable. It is also no good for sets.

Another storage option that sorts your Legos by size (with a quick shake) while it stores is the Lego Storage Head. It is a 11.5″ cube and can hold about 1000 pieces so is again only really ideal for quite a small collection. There is a built in carry handle for portability and it also costs about $40 (check current price).

Lego Head Sort & Store


22

Combined Play & Storage Boxes

Why not opt for a combined Lego storage and play solution? These boxes from Etsy.com are practical and fun. They are effectively a mini Lego table with Lego storage underneath.

They are available in a 3 sizes – the travel version at 12″ x 7″ x 3″ (cost $22.50), the portable box at 12″ x 12″ x 3″ (cost $30) and the larger play box at 16″ x 16″ x 6″ (cost $60).

The lid slides off giving access to the bricks and the whole box is easily carried with the rope handle.

Etsy Combined Play Storage


23

Combined Play & Storage Mats

As well as boxes there are mats. I love this idea and I have seen a few similar versions when researching this Lego storage ideas article. It is so simple, yet combines room to play with clean up and storage – all in one. What more do you need? OK Legos sorted in some way … but other than that, it’s perfect!

Basically it is a round play mat with some sort of drawstring round the outer edge (they differ on different versions). The Legos are kept on the mat and at the end of play, you pull the drawstring and the Legos are collected inside the resulting ‘bag’. The bag can then be hung up or stored away. They are ideal for playing with Lego on the move, either in your home, or on play dates.

Here are a few products that you can buy along with some you can make:

Lay-n Go Play mat – has two sizes available: the large 60″ version (costs $64.95) and the small 18″ version (costs $24.95) which would be perfect for travelling. Check out the video for how easy to use these play mats are.


Neat ‘n’ Tidy Playmat – whilst not specifically for Lego, this play mat does a similar job to the others. It has no drawstring though, but rather uses three simple folds, velcro closures and sturdy handles to close the bag. It is 43″ in diameter, washable and will hold 5+ lbs of toys. It costs $33.

Neat N Tidy Playmat


Swoop Toy Bag And Playmat – is made from 100% cotton canvas with a nylon drawstring. It measures 44″ in diameter, is washable and available in 6 colors. It costs $45.

Swoop Toy Bag


Gogosac – another playmat made from 100% cotton canvas that is 55″ in diameter, has 2 drawstring handles (that cannot be tripped over) and comes in 3 colors. It is 100% washable and costs $40.40.

Gogosac


Make Your Own

If these ‘To Buy’ prices sound a bit steep to you, the idea is quite simple so you could make your own. Here are a few ‘How To’ articles I’ve found on my travels:

A water resistant version from Instructables.com – great for ‘anywhere’ play.

Instructables Play Mat

A drawstring sack playmat tutorial from BellGirl.com.au.

BellGirl Play Mat

For a more complicated version, try this one from Freshly Pieced.

Freshly Pieced Playmat

And here’s another one – with lots of helpful step by step photos – from Make It Perfect.

Toni Coward Playmat


24

Combined Play & Storage Tables

Tables that double up as storage are ideal for playing with Legos. They are so ideal in fact, that loads of people have already bought or made one. Most have built in baseplates making a sturdy base for those huge structures kids love to build.

Here are some ideas to buy:

This Lego table with storage from Jonti-Craft measures 25″ x 28″ x 19″. It comes with one mounted base plate (Lego or Duplo options) and the four storage tubs that fit under the top are optional. It’s not cheap though at $236 (excluding the tubs).

Jonti-Craft Table

This is another pricey option, but the Imaginarium table and chair set has the great feature of mesh drawers. These are basically drawers that can be pulled out from beneath the table with nets attached to the wooden surround. Legos can either be selected from the net or swept back in after playtime. It measures 23″ x 23″ x 19″ and the table top is actually double sided – one side has Lego baseplates, the other has a smooth surface for other play activities. It costs around $160 (check current price).

Imaginarium Table

For something a bit cheaper this 2-in-1 activity table from KidKraft costs about $134 (although is cheaper on Amazon). It measures 25″ x 23″ x 17″, has a double sided top (one featuring Lego baseplates, the other a smooth top) and comes with 200 Lego-compatible blocks and a 30 piece train set too.

KidKraft Lego Table

Here are some ideas for Lego tables with storage to make:

This table is pretty impressive and if your DIY skills are up to it you can make your own using the free Instructables ‘how to’ guide. I really like the gutter to catch bricks as they get knocked and the non-drawer storage design.

Instructables Table


This Lego storage table from Etsy.com has a large top (55″ x 38″) as well as 12 deep drawers built in that are perfect for storing your Lego collection. It has a nice top rail to stop bricks falling onto the floor. The PDF of the professionally measured drawings are available to buy for $20 but then you’re on your own!

Etsy Lego Table


Check this out for a great idea. Take an old coffee table, cut a hole nicely from the middle of it, mount a basket underneath for easy access or clean up and stick some Lego base plates down on top. Wow – I love it. And Sustainably Chic Designs got it for free – I’m so jealous!

Sustainably Chic Designs Lego Table


Here are a few small versions that you can keep in the corner and store your box of Legos underneath. They are from House Of Woyaks, Ordinary Mom, Seasons With The Sewells, Skip To My Lou and My Little Gems respectively.

House Of Woyaks Lego Table  Ordinary Mom Lego Table  Hope Sewell Lego Table

Skip To My Lou Lego Table  My Little Gems Lego Table

A few of these great sites point out that you should use a piece of Lego to measure the exact spacing between multiple base plates.

How about another table and storage tub combined idea? This one from IkeaHackers.net is pretty awesome. It cost about $120 I think but looks pretty big and you could amend the design to suit your needs quite easily.

Ikea Hackers Lego Table


This drawer-cum-table combo unit from Playing House is a great idea to create a whole Lego work area. It basically takes 2 drawer units, sticks a table top across the top and voila, Lego play/display, storage and organization is taken care of. And it only cost $40.

Playing House Lego Table


25

Combined Play & Store Under The Bed Board

For a practical play and store idea, check out this idea from Triplets Plus Another. It is a board on wheels that slides under the bed for storage. It has a lip around the edge so things don’t fall off and is big enough to store and play on.

Triplets Plus Another Lego Storage


26

Lego Instruction Booklet Storage

All Lego sets come with instruction booklets. If thrown in with the brick collection they will get dog-eared, torn or even lost. Why not keep this paper clutter out of your home after the first build, as you can download them all again anyway from Lego.com.

If you do want to store them, either keep them in a Ziploc bag with the set pieces (as shown above) or perhaps in plastic sleeves within a ring binder (maybe not ideal for little fingers), in a concertina file, piled in a storage box or drawer, or use them as room art and frame them.


Don’t Forget The Various Stages Of Lego Play

So that’s the end of our ideas for Lego storage bins. When choosing which one is best for you, you need to remember that playing with Legos is a bit of a journey.

You need to look for long term storage solutions for the bulk of your Lego collection, but you also need to consider the ‘in progress‘ and ‘finished‘ pieces.

Build buckets are ideal for those ‘in progress’ masterpieces that are half finished when it’s time for dinner or bed or whatever. Kids don’t want to just lose the pieces they’ve carefully found and constructed by merging them in with the main collection. So keep a Lego storage box, bucket, basket or bin designated as ‘in progress’. Check these out from I Heart Organizing.

I Heart Organizing Lego Build Buckets

Kids are often very proud of their Lego creations and want to keep them ‘built’ for a while before dismantling them and adding them back to the collection. As such, whilst organizing your Lego, you will be wise to find a dedicated space to display finished pieces which get rotated back into the brick pile when a new masterpiece has been created. Ideas include their play table, or on a shelf in their room. I know you’ll have to dust it then (which is no mean feat) but your kids will be chuffed and inspired to keep creating.


Organizing Your Lego Collection

We have talked about WHERE to store your Lego collection but not really about HOW.

The decision to sort your collection, whether by color, brick type, set or whatever is really a personal one. You know your kids the best and what they want and will be able to maintain. But it is definitely something to consider before you make or buy a storage solution.

There’s no point buying a large storage box if you want to sort your collection. Conversely you may be better with the kiddie’s pool idea rather than drawers if you don’t want to sort your collection, say for example, if your kids prefer to see everything at a glance.

As your collection grows, wanting to organize it in some way sort of creeps up on you. You might start with it all in one big box, but as you get more sets you’ll probably keep those together, then as you start wasting time hunting for bricks of the right size or color, you might want to separate the collection out.

Age plays a big part in when it is time to organize your Legos. Younger kids are happy with a big pile so the shallow box or playmat bag type storage solutions are very useful. Older fans, however, will be looking to keep their random bricks separate from their Bionicles say.

The size of your collection is another factor that may influence your decision to organize your Legos. As soon as you split your collection between more than one box, you need some way of sorting it between the smaller bins in a meaningful way.

As I said before, you can group your Lego collection in various ways – color, type, function, set etc. Each has its own advantages and disadvantages. Ask your kids how they would like their Legos sorted – some build by color, some build by type.

It is almost always best to keep your sets separate from your random brick collection. This is until you know your kids will not build that particular set again, so it is time to mix the pieces in with the rest.

Make sure you think about how easy your ‘grouping’ will be for your kids to follow when they clear up. Color is often the easiest method but you should be mindful that the more you sort your bricks, the longer it takes to clean them up and the more likely they are to become unsorted again.

You also want to ensure that the ‘clearing away’ process, doesn’t detract from the Lego fun. If it does, you may find that your kids no longer want to play with their Legos which would be a real shame.

You also don’t want to add more chores to your day if you end up being the one to keep the system going.

If you do choose to organize your Legos, make sure you have a dedicated ‘To be sorted’ bin that can be filled during the week say when homework or bedtime calls, but must be sorted over the weekend.


Keep Them Building

Lego multiplies. It doesn’t matter who you are or how many kids you have, what starts out as one box soon grows into two then three then twenty and before you know it, your home is being taken over by these colorful plastic bricks.

Lego is such a great investment that you should really make the effort to get organized so that it doesn’t get lost all over your house. It lasts forever so if looked after properly will keep your grandkids and even their kids happy for years to come.

As you can see there are plenty of storage options for you to consider. The best ones are attractive, versatile and practical but above all suit the individual needs of your collection, your kids and your ideas for organization.

Personally I think a combination of solutions works best – Ziploc bags for sets and instructions, drawers for colors, and separate buckets for ‘in progress’ and ‘to be sorted’.

Just remember though that no matter how well you ‘plan’ on it being organized, no amount of organizers, boxes, drawers and bins is going to make your kids co-operate and actually use them! Some kids work best and actually enjoy the ‘bin digging’. And if all else fails …. just shut the door!

For some final inspiration, check out this ultimate Lego room from Honey And Fitz.

Ultimate Lego Room from Honey And Fitz


Fancy A Good Book To Read After All That Lego Fun?

Take a magical journey into ‘The Mystical Wood‘ where a boy, meets a wizard, a dragon, a giant bumblebee and a T-Rex.
This terrific adventure has 5 chapters, full color illustrations, and is told in rhyme, like the Gruffalo.

It’s for kids aged 5+.

Available HERE on Kindle or in paperback.

Try the Kindle for PC App to see the color pictures.


I’m Linking Up To These Blog Parties:

I’m An Organizing Junkie
A Bowl Full Of Lemons
Delightful Order


I’ve Been Featured

Nursery Storage Ideas: Make Your Own Crib Pocket Organizer

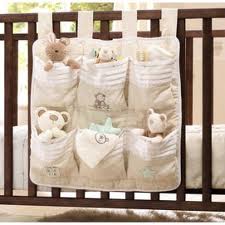
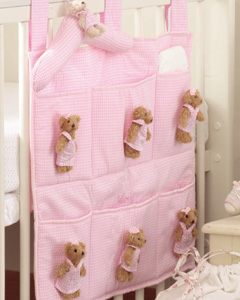
Crib Organizer From Kaboodle.com   Pretty In Pink From Dibor.co.uk

Aren’t these pocket organizers just the cutest thing? And handy too to get organized in your nursery! Just wrap the straps around the crib rail, tie to secure and everything you need to change your baby’s diaper or to get him dressed and ready for the day is within reach and ready to go.

Cute crib organizers are not easy to find especially if you want one to match your décor or theme or to fit your specific needs. So why not make one yourself?

Shopping list

To make one like those shown above you will need:

1.5 yards of gingham fabric – $6
Three 18 inch lengths of grosgrain ribbon = $2
12 hook and loop dot sets – $1
A roll of polyfil quilt batting – $4

Total cost = $13

Optional decorations: mini plush figures, wooden shapes, ribbons – whatever takes your fancy and fits your budget.


How to make a crib pocket organizer

Cut the fabric into 3 pieces

Divide the piece of fabric into 3 equal parts measuring half a yard each. Set one aside. The other two pieces will become the main body of the crib organizer. Measure and trim the pieces so that the final measurements are about 34 inches by 20 inches.

Cut the batting

Once you have the 2 pieces cut to size lay the batting over the fabric and cut the batting so that it will fit between the layers of fabric. The batting should measure about 33 inches by 19 inches minimum.

Prepare the fabric for the batting

To finish the edges and secure the batting in place first you will need to fold the edges over 2 inches on all four sides. Next run a hot iron over the folded edges to set the seams. Once that is done place the batting between the layers positioned so the folded edge from the front piece of fabric wraps around the edges of the batting and the back piece folded edges are facing the batting and lying flat. Pin the sides in place to prevent the fabric and batting from shifting when run through the sewing machine.

Position the ribbon

Before sewing the edge seams measure and cut 3 lengths of grosgrain ribbon to 18 inches. Fold each length of ribbon in half and then place the ribbons with about an inch of the folded edge between the batting and fabric layers. Place the ribbons so that they are evenly spaced across the top of the organizer as they will become the ties that will secure the organizer to the crib rail.

Sew the outer seam

Now you are ready to sew a 1 inch seam around all four sides, paying close attention to the top edge to ensure the ribbons are secure and that the batting is completely enclosed as this will keep the batting in place and create the quilted look that makes this organizer so appealing.

Cut the fabric to make the pockets

To make the pockets you will need to fold the remaining half yard of fabric in half, iron the fold and then cut on the folded line so that you now have two pieces of fabric. Now fold each piece in half and trim so that each piece measures about 18 inches tall by 22 inches wide. You should have two pieces that are this size that will become the front pockets for the organizer.

Cut the batting for the pockets

Now cut a length of batting that will fit sandwiched between the fabric layers and then finish the edges like you did for the main body of the organizer by folding over the edge and then ironing in place.

Sew the seam on the pocket fabric

Next sew a ½ inch seam all the way around each piece of fabric. You should now have two strips of fabric with batting secured inside.

Create the pockets

Now measure 2.5 inches from the right side and make a 1/4 inch pleat and secure with a straight pin. Measure across 2.5 inches from the pleat and mark a vertical seam. You have now outlined the outside pocket. Repeat the pocket making process by measuring 3 inches from the vertical seam, make the pleat and then mark the vertical seam 3 inches from the center pleat. To complete the pocket measurements continue across 2.5 inches, create the center pleat and secure.

Attach the first pocket strip

Pin this pocket strip to the front of the organizer so that the bottom edge of both pieces and the outside edge of the pocket piece line up with the edge of the body of the organizer. To attach the pocket piece to the main body simply sew a straight ¼ inch seam down one outside edge across the bottom and up the other outside edge. To create the individual pockets just sew a straight seam down each of the vertical seam marks.

Attach the second pocket strip

Repeat the pocket process for the second row of pockets. The only difference for this row is that the bottom edge should be placed about 4 inches above the top edge of the lower pocket row. Once the final pocket row has been completed remove all the pleat pins and your crib pocket organizer is nearly ready for use.

Attach your decorations

To make it even more special use peel and stick velcro hook and loop dots to attach decorations to the front of each pocket. Be adventurous!

Fit onto your crib & start using

Your pocket crib organizer is now ready to be put to use. Fasten it securely on the end or side of your crib and fill the pockets with whatever will be most useful to you. Diapers, cloths, clothes, toys, rattles??? What will you use it for? Please let me know.

Are Home Organization Products A Miracle Cure For Organizing Your Home?

The market for home organization products is on the rise despite the recession. Both Peachtree Consulting and The Freedonia Group predict annual growth in this market over the next few years, resulting in consumers spending a predicted $8.6 billion in 2015.

Some studies suggest that this increase is in fact due to the recession. Packaged Facts state that:

“Consumers are opting to funnel their strained funds into home organization products designed to make their homes more comfortable, less cluttered, and ultimately less stressful.”

As householders are struggling to afford big ticket items, they are opting for more affordable home organizing products to make them feel better about their home and life.

However, are these purchases having the desired effect?

Apparently NOT for the 71% of consumers surveyed by NAPO, who said that their:

“Quality of life would improve if they were better organized”.

So what is going wrong?

Consumers are buying more home organizers but are still not better organized. Why? Because they are NOT a miracle cure.


Why should you care?

If you are one of the many wannabe organizers who are thinking of buying some products to help you get organized, STOP.

As OrganizedHome.com explain in their Tightwad’s Guide To Getting Organized, thanks to savvy retailers, the phrase ‘Getting organized’ is synonymous with ‘Buy Me’. But you shouldn’t confuse the two as getting organized doesn’t necessarily require spending money.

You cannot buy an organized home (unless you hire a professional organizer to do it for you). You need to spend time and effort, and only sometimes money, to achieve your goal.

If you are a wannabe organizer, who is currently using the cost of organizers as an excuse to stay disorganized, TIME’S UP. I’m calling you out, stop hiding, get off your butt and get started. You don’t need to spend much, if anything at all.

Housekeeping at About.com report that “I can’t afford to get organized” is one of the top 3 excuses people give for not being organized. Well now YOU can’t use that excuse anymore!


Some say home organization products are a necessity

MarketResearch.com confirms that consumers believe they can buy a more organized life. They state that:

“US consumers, particularly middle- and upper-class households, are willing to pay more for items that will make their lives easier and more organized.”

Is it any wonder that this is the belief held by many? Just walking round a home store or flicking through a home magazine can make you feel as though you can’t get organized without the latest spice rack, knife block, or decorative storage box.

And then you go online and read things like:

“Organizing tools are not luxuries, they are necessities.”

from a forum thread at FrugalVillage.com. So you can be forgiven for thinking that the first thing you need to do to get organized is to buy a load of organizers.

(NB: The rest of that forum post is actually useful in giving ideas of where to find organizers without spending a lot.)

But let me remind you that shopping for organizers is in fact one of the last things you need to do, if you need to do it at all. Remember:

Declutter_Measure_Buy

The trouble is shopping for organizers is fun. Using them on the other hand is less so, unless they are the decorative kind. This is perhaps the only time that buying an organizer first will actually get you started as you’ll be so excited to get it on display.

But for the most part, if you can afford to buy organizers, you should use their purchase as a motivational tool. Declutter first and THEN treat yourself to an organizer if needed.


I say home organization products are not a miracle cure

Organizers are not the answer to your home organization problems. You could have a truck load of storage boxes, bins, racks and holders delivered and STILL not be organized. You could also have none of the above and be super-organized.

This quote from Alejandra Costello, a Certified Professional Organizer, is typical of what can happen when householders fall into this trap:

“We find abandoned organizing products all over the house, all of which means, they bought a bin, it didn’t fit or solve their issue and now it’s in storage in their basement or garage. Sound familiar?”

And here’s another great one from OrganizedHome.com:

“Nobody ever got organized by buying stuff. Instead, they ended up holding a yard sale.”

So what is the answer?

In a word – Decluttering. Sorry to disappoint you but organizing is not a problem that you can throw money at and it will go away. You will have to set aside some time (I recommend regularly every day) to go through your things and toss or donate everything you don’t NEED or in some cases WANT.

Here are some tips from Oprah’s organizing guru:


So are home organization products a waste of money?

No, that is not what I’m saying. Organizers can be bought for just about any purpose in the home, from kitchen drawers and cabinets to closets, garages and home offices. Most are affordable and functional and they have a place in getting you organized, IF you have already decluttered.

BUT:

They are not a necessity, like say your trash bin. Many times, after you have decluttered, you have the available storage space to store all of your items without them.

They do not need to cost a lot of money. There are plenty of ways to find organizers cheaply, perhaps at yard sales or by using cheaper boxes meant for something else. You can also get organizers for free. Think of things you already own to repurpose or things you can make, such as this cereal box desk organizer from MarthaStewart.com.

Cereal Box Organizer


Don’t add organizers to your pile of clutter

For years, I thought that buying organizers would make me organized. Now my home is cluttered with empty plastic storage bins, flat packed cardboard boxes that have never been opened, shelves that are not put up etc.

Why? (1) Because I haven’t finished decluttering yet and (2) because I now realize they are too big. I prefer smaller organizers, like old margarine tubs in my kitchen drawers, rather than huge ones that just allow the contents within to become cluttered.

I grew up in a super-organized home and it was only when I had my own house that I realized what a full time job it could be to get organized. I thought organizers were the answer but they’re not.

Researching for this website taught me that time and effort are what are needed to get organized – not organizers. As I begin to implement my 5 minute clutter crack down routines, my cabinets, closets and rooms are slowly becoming organized. I have not bought an organizer yet (but will do soon as a treat!).

It’s true that there are no immediate shopping highs from walking out of the shop with your organizer. It’s not like New Years Day when you’re still optimistic about sticking to your resolutions. But then there is also no guilt when a few days or weeks later, you stumble across the un-used organizer. Don’t buy organizers until you have decluttered and you will avoid the yo-yoing of emotions that you may already be used to.

Buying an organizer is not the time to think ‘job done’. Learn to see regular decluttering as success and shopping as your reward and you will soon achieve positive results.


Practical ways to give up your organizer obsession

I want you to practice organizing without purchasing an organizer so you can prove to yourself that it can be done.

So here are 5 ideas of things to do – try a few:

  • Start keeping cardboard boxes or empty margarine tubs or even egg cartons so you have some free organizers in stock for when you need them.
  • Choose a kitchen drawer, empty it and be ruthless with your decluttering. If you don’t use the utensil or whatever it is in there daily or at least weekly, either toss it, donate it or if you can’t bear to part with it, put it in one of your cardboard boxes, neatly labelled with kitchen goods, and store it in your basement or garage. Organize the remaining things into groups of like items. If they really all should go in the same drawer, either cut up some of your cardboard boxes to make drawer dividers or play Tetris and arrange smaller boxes or margarine tubs so that they fit perfectly. If you don’t like the cereal box décor – cover it with contact paper or gift wrap.
  • Instead of focusing on the products you’re feeling deprived of buying, look for online resources that show you how to make them and spend that shopping time, crafting. You could even get your kids involved.
  • Check out these great ideas for “How to get organised with non-traditional items” from Home Life Simplified.

  • Instead of rushing to order the latest organizer that you see in your magazines, clip out the details and start a scrapbook. Think about where you would use it and make a plan to declutter that drawer, cabinet or closet before you buy it. You will probably find you no longer need it when you’ve finished.
  • Find out when the next yard sale is on in your area. Make sure you declutter a drawer, cabinet or closet before you go. Measure the space and see if there are any bargain organizers on offer that would suit your needs.

I’m sure that once you move past the idea that storage and organization products are the answer to your organization problems, you will feel liberated. You will be able to grab 5 minutes here and there to declutter without having to have gone shopping for an organizer first and you will not feel guilty for buying organizers that you either don’t need or use.

Nursery Storage Ideas: Make Your Own Baby Room Storage Buckets

Pottery Barn Kids Enamel Nursery Wall BucketsI just love how cute these baby storage bins from Pottery Barn Kids look.

But I was less keen on their $99 price tag for a set of three. Yes they’re made of iron with an enamel finish, have a wooden grip and come with wall mounts, but really – $99 for three buckets?

Having said that, getting organized is a must when it comes to getting ready for your family’s new addition. Finding a proper place for things and getting them in order can be fun. And when you repurpose items from another part of your home in an unexpected yet imaginative way, it can be decorative too.

So how about making some of these buckets yourself?

When labeled and hung on a nursery wall what is usually thought of as a household cleaning supply becomes handy storage for those everyday items at just an arm’s length away from your changing table.

To make these handy nursery storage bins to hold changing table accessories you don’t have to spend $99. Try $30 instead. Doesn’t that sound better? Yes, you can make your own trio of trendy baby storage solutions for $30.


All you need to create this look is three milk pail type buckets made of either papier-mâché or galvanized steel, spray paint, acrylic paint and a stencil.

Before you begin you will need to decide which type of milk pail you wish to use. Papier-mâché is a more light weight option that will end up looking just like the heavier galvanized metal option.

Galvanized Bucket

==> Click HERE to see the full range <==

The only difference the weight will make is in how it will be mounted on the wall, if it will be mounted that is. A wall bracket can be used for either the papier-mâché or the metal bucket while a hook and wire hanger will only be a viable option for the much lighter papier-mâché version.

Now that you have chosen the bucket style of your dreams it’s time to get to work with the paint.

Choose a semi-gloss multi-purpose spray paint in the color of your choice.

Spray Paint

==> Click HERE to see the full range <==

When applying the base color to the buckets be sure to only use the spray paint outside or in a well ventilated area. Laying down a layer of newsprint or craft paper is also a good idea for providing a clean, dry work surface. Follow the application instructions on the label of the spray paint product you have purchased to ensure optimal coverage.

Once the base coat layer, or layers as the case may be, is dry the next step is the labeling. The most simple or basic method would be to use a permanent marker or paint pen to free-hand the words or letters onto the front of the bucket or pail, however, unless your hand is steady and your penmenship impeccable, it might not be the most attractive method to use.

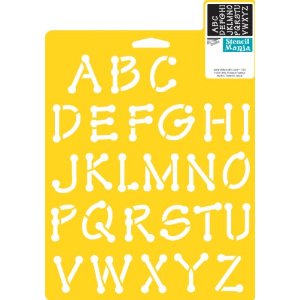
For the best lettering results alphabet stencils are the way to go. To hold the stencil in place, painter’s tape is excellent, that is unless you have an extra pair of hands to help with this step.

Alphabet Stencil

==> Click HERE to see the full range <==

Choose some acrylic paints in colors that coordinate with your baby’s room to be used for the lettering and the bucket’s trim. Remember a little acrylic paint will go a long way so only small tubes are needed.

Acrylic Paint

==> Click HERE to see the full range <==

Place a small amount of paint onto a plastic or ceramic plate. When using stencils it is best to dip the sponge-tipped dauber into the puddle of paint so that only the flat tip of the sponge is saturated with paint. Before applying the paint to the stencil area be sure to remove excess paint from the sponge tip by dabbing the sponge on a clean paper towel. This will prevent paint from bleeding under the stencil and ruining the while thing.

Let the stencil paint dry for 10 to 15 minutes before removing the stencils as this will help prevent the paint from smudging. Once the base coat and lettering are completed the only thing left to do is the accent paint around the rim of the bucket. Just paint the top edge with some dark acrylic paint and leave to dry.

A wall bracket as previously mentioned can be used to mount the buckets on the wall. For a more versatile variation try placing buckets on floating shelves or across the top of a dresser or book shelf.

This project is very easy and inexpensive and the truly wonderful part of it is that no one will ever know just how easy and affordable it was unless you tell them!

Shopping List

Galvanized bucket 6qt x 3 = $19
Semi-gloss multi-purpose spray paint = $7
75ml tubes of acrylic paint = $1
Alphabet stencil = $2
Sponge-tip stencil tool = $1

Total = $30

The total cost with papier-mâché buckets would be much less.

I’m linking up to these blog parties:
The Shabby Nest
Chic On A Shoestring Decorating