Imagine your tub filled with hot bubbly water and a glass of bubbly waiting for you to sip whilst you indulge in your peaceful and relaxing bathroom.

Photo credit: theswedish via sxc.hu
But do you open the door to your bathroom and see every flat surface covered in lotions and potions and wet, damp towels?
Don’t despair – a bathroom oasis is not that difficult to obtain.
The main clutter points in a bathroom are:
- the sink and vanity unit,
- the tub surround,
- the shower cubicle,
- towels,
- the medicine cabinet and
- any drawers you may be lucky enough to have.
Let’s take each one at a time and think about some bathroom organization ideas that could help achieve your perfect relaxing oasis.
First the organizing rules
But first let’s remember the overriding organizing rules to guide you through each area:
Declutter first – throw away anything that you do not need or love, in other words those lotions you haven’t used in the last 6 months or that rusty old razor. When in doubt, throw it out!
Check the expiration dates on cosmetics – they go off you know. This great post from Beauty Top To Toe will tell you all you need to know about how long you should keep make up for.
Relocate – duplicates by moving them to your excess storage area (this may well be under your sink if you have room) or stuff that doesn’t belong in the bathroom (eg, I had loose change in mine – why??!!).
Group like items together – there are plenty of different things to be found in a bathroom, such as mouth care, hair care, skin care, cosmetics and nail care items to name just a few. Make sure each group is stored together to give easier access to your items and also so you know when a certain item is running low and needs replacing.
Plan out how to use your available space in the most efficient way – this may involve choosing the most useful place for each group of items to be stored or adding organizers to help ‘create’ extra space.
OK, OK, I’m getting there – here are the ideas for how to organize these key areas of your bathroom:
THE SINK & VANITY UNIT
Keep in mind your daily routine when organizing your sink area. Things that you use daily should be stored within easy reach. This maybe in a pretty dish or basket on top of the counter, in the top drawer of your vanity unit or corralled in a plastic bin under the sink.
Things that you don’t use very often should be stored in the less accessible places. Either on high shelves or at the back of cabinets.
1
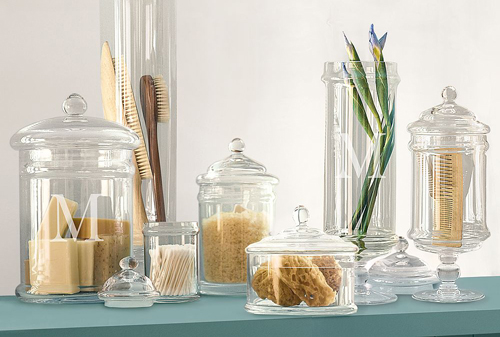
Attractive countertop storage
Apothecary jars, glass tumblers and other glassware are ideal for your countertop or on a shelf above the sink. They are stylish so can be left out in the open and you can mix and match shapes and sizes, from low bowls to wide mouth jars to suit whatever you want to store.
Items such as cotton wool balls, soaps and bath salts all look attractive if left out and the glass jars offer easy access as well as allowing you to see when things are running out.

Photo credit: houseonthehillblog.files.wordpress.com via Jillian on Pinterest
You should always keep makeup brushes upright in a tumbler to stop them from dusting up your drawers.
As well as glass containers, you can also choose attractive baskets to leave out on the counter. If you ever want to clear the counter, perhaps if guests are coming, you can always just put the containers inside the vanity.
I would probably avoid plastic jars if you are going to leave them out on show as they are not the best look, but you should be able to find a wide range of affordable glassware online or in second hand stores.
2
Be original with your containers
To keep your bathroom storage interesting, look for unique containers to corral your items. You can then leave them on display or keep them inside cabinets. You can pick up inspired pieces when you see them at yard sales, on offer in home stores or at online auctions for example.
Ideas include metal sand pails, kitchen platters, cottage style jugs and mugs, garden planters, wicker baskets and tiered cake stands.
You could also make your own tiered storage by sticking two different sized dinner plates to either end of a candlestick.

Photo credit: westelm.com via Melissa on Pinterest
3
Not much counter space?
If you do not have much counter space around your sink, think about installing a shelf above it or choose a mirror that has a built in ledge. You could even hang an attractive bucket next to the sink which would easily hold all the items you use on a daily basis.
If you’re into DIY, why not consider installing some shallow drawers or cubbies into the wall space. Find the gap between the drywall studs and make use of it.
There are also plenty of sink type organizers available to help give all the standard bathroom items a home. These include toothbrush holders, soap dishes etc. And how about a piece of corkboard covered with fabric on your wall to hang up your jewellery?

4
Plumbing issues?
As I discussed in my ‘how to organize under the kitchen sink‘ post, if your sink is mounted into a cabinet, organizing underneath may be tricky due to the plumbing fixtures. If your sink is on a pedestal, your problems are increased as you have no hidden space, although you could fit a ‘skirt’ to give an area where cleaning products or extra toilet paper could be stored neatly.
If plumbing pipes are your problem, pretty baskets or buckets to corral similar items are the cheapest solution. This way you can pull out the basket for whatever you are doing, say your hair or nails, have everything to hand on your countertop and then put it away quickly and neatly once you are finished.
For organizers designed with plumbing fittings in mind, you can find stepped shelves that are narrow at the top and wide at the bottom. There are also others on brackets that slide in and out. These work well as they give you easy access to items stored at the back of the cabinet.

Photo credit: marthastewart.com via Katie on Pinterest
5
Under modern sinks
Modern sinks and countertops tend to float out from the wall. Skirts that are suitable for pedestal sinks do not tend to look good in this environment. Instead you need to make use of the floor space with attractive storage options or tools.
Large wicker baskets packed full of fluffy towels is an easy option but my favorite is to use multiple wooden magazine racks and to stack about 4 rolled towels on each one. There’s a picture here from BHG.com:

You could also just use the space to store a pretty trash can or a step stool if you are making use of your vertical space with high shelves above doors and windows.
6
Small cabinets
If your cabinet is quite tight for space, organizers such as shelf expanders, slide out organizers and lazy Susans are a good idea as they offer easier access to all areas of the cabinet. They can easily double the useful space within.
Don’t forget the back of the vanity doors too as they are ideal for storing items such as hairdryers and flat irons which can be hung on hooks. You can also get over the door hanging racks, shelves and baskets to make the best use of the space.

Photo credit: familyhandyman.com via Elizabeth on Pinterest
Try not to waste the space at the side of the vanity as well if it is not fitted wall to wall. Fix a towel bar or shelves to it.
7
No vanity unit?
If you don’t have a vanity unit in your bathroom, consider buying a freestanding unit instead or repurposing a dresser or bookcase that you no longer use or have picked up at a yard sale. Just use polyurethane to protect the wood from moisture damage.
You could also use a chest or bench seat. These are ideal for storing larger items such as towels or your extra supplies of toiletries. These are nice to have on hand if you have the room.

Photo credit: ana-white.com via Adrienne on Pinterest
8
Lots of bathroom users?
If your bathroom has a lot of different users and if you have the space, you should consider using a shelf or basket for each family member. That way everyone will know where their items are and where they should be returned to.
9
Cleaning supplies
Under the sink is a great place to keep a caddy of cleaning supplies. Keeping them close at hand, perhaps with a hook for cleaning cloths on the back of the door, makes it easier to have a quick wipe round every day, reducing the time taken for a big clean later.
THE BATHTUB
10
The tub surround
Depending on how much of a surround your tub has, will determine how much you can store there and whether you need to look for alternative storage options.
If you have the room, then keep your lotions and potions grouped together to look neater, either in chrome racks or baskets, in attractive bins or just on ceramic platters. Maybe use a few chrome hooks to hang your wash cloths, mitts and bath sponges.

Photo credit: citified.blogspot.com via Samantha on Pinterest
11
Use the wall
If you are short on space, one idea is to use the wall. Most wall mounted solutions use suction cups to stick to the wall so they are easy to mount and easy to move about. Designs include racks and shelves which are ideal for shampoo, conditioner, soaps and shaving accessories.
But why not take inspiration from your kitchen organization and mount a sturdy metal rod (often used for utensils or pots and pans) on the wall along the length of your bath? Use the included hooks to hang individual racks or bins to corral your items like this one from BHG.com.

If your tub is boxed in you could also use a chrome shower curtain tension rod to hang things on.
A more complicated but integrated wall solution is to use the space between wall studs to create a recessed storage area.
12
Over the tub
An alternative to wall storage is to use an over the tub rack. These balance on either side of the tub and can be positioned anywhere along the length. I particularly like this one by Umbra made from bamboo and chrome that has a soap holder, book support and wine glass holder. Now that’s what I call a relaxing soak! It costs about $40 (check current price).

13
Built in
If you want a minimalist look, why not build some bathroom storage into your bath itself. This would be perfect for a small bathroom.

Photo credit: bornrich.com via Angie on Pinterest
14
Use uniform bottles
Wherever you store your bathing supplies, you may find that just lining up the manufacturer’s bottles of bath salts and body wash may not look that attractive. So instead it may be worth decanting your bath products into uniform bottles.

Photo credit: marthastewart.com via Bronwyn on Pinterest
15
On the floor
Fresh fluffy towels add a cosy, comforting touch to any bathroom. If you have the room, keep a stock by your tub in a huge wicker basket.

Photo credit: worldmarket.com via Justineh on Pinterest
THE SHOWER CUBICLE
Another notoriously messy place, the shower cubicle, is often home to a collection of half empty bottles of shampoo, body wash etc. There may also be surplus bottles, soaps, shaving supplies and even cleaners laying about. But why? There are many shower organizers available.
16
Wall suction
For a quick to install solution look no further than the wide range of caddies, baskets and other organizers that simply stick onto your shower wall. They come in a range of shapes and sizes so one or a few of them are bound to fit your needs. His and hers comes to mind.

17
Hanging
Another option is a hanging organizer. You can find those that hang over the shower head, over the taps, over the door or shower rail as well as from the ceiling. Wherever you fancy grabbing your supplies from, you can find an organizer to fit.

Photo credit: Courtney on Pinterest
How about this shower caddy octupus which, if you ask me, is just plain weird – not to mention expensive at $35 each.

Photo credit: sleekidentity.com via Lizzie on Pinterest
18
Built in
As with the sink and the tub, you can also build recessed storage in between the studs on your shower wall. Install shelves or a rod or whatever takes your fancy.

Photo credit: houzz.com via Lauren on Pinterest
19
Tension pole
For a bit more stability than perhaps is offered by suction cups, tension pole organizers expand to fit perfectly in the space between the shower floor and ceiling. Often coming with 3 or 4 shelves or baskets, they are ideal to store all of your shower supplies conveniently in the corner.
This one from OXO has received rave reviews despite being somewhat pricey at around $130 (cheaper on Amazon). If that’s a bit expensive, they also do a nice 3-tier shower caddy for about $30 that hangs from the shower head and uses suction cups for stability (see #16 above).

20
Freestanding units
If you have a large enough shower with a flat base, you can find free standing shower organizers that fit neatly into a corner. Look for ones with rubber feet to prevent sliding.

Tips:
- Limit the number of toiletries you actually keep in the shower cubicle. One bottle of shampoo will do – keep your spares in the vanity unit.
- When looking at shower caddies, choose those that are quite deep so that your shower supplies don’t slip out.
- Also look for those that are made of wire mesh or have large drainage holes to save you having to empty stale water out every day.
- For something really functional, organizers that hold bottles upside down are perfect for getting out that last bit of shampoo or whatever.
BATHROOM TOWEL STORAGE
I love big fluffy fresh towels don’t you? The soggy, used ones – not so much!
But it seems to me that unless you wash your towels daily, you need somewhere to store both – fresh and soggy.
21
Fresh towels
The fresh ones are easier to store. They can be rolled or folded and stored in any number of ways. Ideas include wicker baskets, high racks above the sink or tub (like in hotels) where you can stack them or hang them, towel ladders and wall mounted magazine racks.

Photo credit: myhomeideas.com via Amy on Pinterest
My favorite unusual idea though is to use a wine rack to hold rolled towels.

Photo credit: sundancecatalog.com via Elise on Pinterest
22
Soggy towels
Those towels that are in use and potentially soggy are a different matter. Folded or rolled they are not going to get dry and there’s nothing worse than drying with a damp towel.
So the first thing to make sure is that you have enough hooks or racks for each family member. That way each towel has its own drying space.
You then need to know whose is whose. I’ve come across a few ideas including putting a piece of different colored ribbon on each one as well as my favorite – putting a framed picture of the person above their hook. This looks very cute in a kids bathroom.
Obviously there are tons of towel hooks, racks and rails to choose from but here are some fancy ideas I’ve noticed whilst researching these ideas: shower curtain rods that have a double rail – the second being for towels, door handles mounted to the wall (not just knobs but the whole plate too), faucet tops fixed into a dado rail, rope towel rails, upside down wooden hangers and a coat stand. You could also just hang towels on pants hangers from your shower curtain rail if it’s strong enough. I’m using this idea for my bath mat after seeing the idea at Joyful Homemaking.

Photo credit: notjustahousewife.net via Erin on Pinterest

Photo credit: marthastewart.com via Daffny on Pinterest

Photo credit: junkcamp.blogspot.com via Lindsay on Pinterest
THE MEDICINE CABINET
OK before we start with ideas as to how to organize the medicine cabinet, let’s be clear that medicines should not be in it. Bathroom = humidity and medicines don’t like humidity so get them out of there!
The bathroom is a high traffic area where storage space is limited. As such, you should only use premium space, such as the medicine cabinet, for items you use regularly. If you like a clear countertop, the medicine cabinet is the place for your everyday items. Here’s how to make the best use of it:
23
Use every square inch
You can do this with suction cup and/or magnetized organizers.
Small flat backed cups, bins or racks are quickly mounted to the inside of the cabinet door or the side or back walls via their suction cups. These can be used to hold combs, brushes, toothpaste and the like. Just be sure you can close the door properly.
Magnetized organizers are more readily available in the smaller sizes needed for the inside of a cabinet so these can be a better idea. Just glue a pre-cut sheet of galvanized steel to the interior and then buy some magnetic hooks or glue some magnets onto small plastic containers with lids and you’re away. Use the hooks to hold scissors etc and corral hair or nail accessories in the plastic tubs.

Photo credit: marthastewart.com via Kari on Pinterest
Magnapods are a brand that specialize in this sort of thing and they have a whole range of magnetic cosmetic holders including toothbrush holders and nail polish organizers.
24
Be efficient within
Choose a cabinet with removable shelves. That way you can fit all your tall bottles in at the bottom and corral small accessories in pots or tumblers at the top.
Buy your cosmetics in bulk or larger bottles but decant them into smaller bottles so that you can keep your daily supplies in the cabinet. Store the original larger bottles in the vanity unit.
If a few members of your family are using the medicine cabinet, aim for one shelf each so that you can each take responsibility for your shelf.
BATHROOM DRAWERS
Drawers have a tendency to turn to chaos because their insides are unseen and because the items within move about over time and merge together into a jumbled mess. As such the golden rule of your bathroom drawer is not to let things overlap. But how do you achieve this?
25
Divide & conquer
Take heed from your kitchen drawers and invest in or make some drawer dividers. Silverware holders, multi-part expanding drawer divider sets, little baskets or interlocking bins, small margarine tubs or even homemade cardboard dividers will do the job admirably.
How about baby food jars to contain hair bobbles, muffin trays, egg boxes or even plastic take out containers? Glass bowls, ceramic plates … the list is endless.
Just remember whatever containers you opt for need to be small enough to fit into the drawer but large enough to hold a particular group of items.
Makeup bags could work if you have a few small ones – one for each group of items. The trouble with them is that they tend to be bulky and you can’t easily see what is inside.
Dividing your drawer will allow you to categorize your beauty products, making finding them and returning them to their home much easier.
Check it out in practice here at Clean And Scentsible.


Just remember to use a thick plastic liner at the bottom to protect your drawer from spills and stains. A rubber mat is ideal if you are using glassware in the drawer as it will stop things sliding about.
Implement one of these bathroom organization ideas today
Your bathroom may sound like a small room to get organized in one session, but when you break it down into these problem areas, you begin to see that the task is bigger than you first thought.
As such make a start – pick one area and declutter it today. When you see what you’ve got left to organize, I hope some of these ideas will help you take back control and leave you with a bathroom where you can occasionally take some time to pamper yourself.
If nothing else just knowing where your bathroom items belong will probably make you put them back as you go, helping to avoid long drawn out cleaning routines later on.


