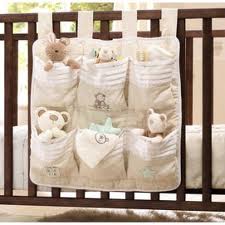
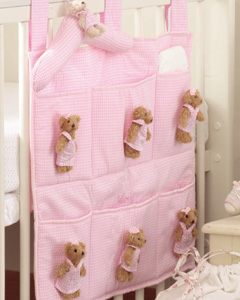
Aren’t these pocket organizers just the cutest thing? And handy too to get organized in your nursery! Just wrap the straps around the crib rail, tie to secure and everything you need to change your baby’s diaper or to get him dressed and ready for the day is within reach and ready to go.
Cute crib organizers are not easy to find especially if you want one to match your décor or theme or to fit your specific needs. So why not make one yourself?
Shopping list
To make one like those shown above you will need:
1.5 yards of gingham fabric – $6
Three 18 inch lengths of grosgrain ribbon = $2
12 hook and loop dot sets – $1
A roll of polyfil quilt batting – $4
Total cost = $13
Optional decorations: mini plush figures, wooden shapes, ribbons – whatever takes your fancy and fits your budget.
How to make a crib pocket organizer
Cut the fabric into 3 pieces
Divide the piece of fabric into 3 equal parts measuring half a yard each. Set one aside. The other two pieces will become the main body of the crib organizer. Measure and trim the pieces so that the final measurements are about 34 inches by 20 inches.
Cut the batting
Once you have the 2 pieces cut to size lay the batting over the fabric and cut the batting so that it will fit between the layers of fabric. The batting should measure about 33 inches by 19 inches minimum.
Prepare the fabric for the batting
To finish the edges and secure the batting in place first you will need to fold the edges over 2 inches on all four sides. Next run a hot iron over the folded edges to set the seams. Once that is done place the batting between the layers positioned so the folded edge from the front piece of fabric wraps around the edges of the batting and the back piece folded edges are facing the batting and lying flat. Pin the sides in place to prevent the fabric and batting from shifting when run through the sewing machine.
Position the ribbon
Before sewing the edge seams measure and cut 3 lengths of grosgrain ribbon to 18 inches. Fold each length of ribbon in half and then place the ribbons with about an inch of the folded edge between the batting and fabric layers. Place the ribbons so that they are evenly spaced across the top of the organizer as they will become the ties that will secure the organizer to the crib rail.
Sew the outer seam
Now you are ready to sew a 1 inch seam around all four sides, paying close attention to the top edge to ensure the ribbons are secure and that the batting is completely enclosed as this will keep the batting in place and create the quilted look that makes this organizer so appealing.
Cut the fabric to make the pockets
To make the pockets you will need to fold the remaining half yard of fabric in half, iron the fold and then cut on the folded line so that you now have two pieces of fabric. Now fold each piece in half and trim so that each piece measures about 18 inches tall by 22 inches wide. You should have two pieces that are this size that will become the front pockets for the organizer.
Cut the batting for the pockets
Now cut a length of batting that will fit sandwiched between the fabric layers and then finish the edges like you did for the main body of the organizer by folding over the edge and then ironing in place.
Sew the seam on the pocket fabric
Next sew a ½ inch seam all the way around each piece of fabric. You should now have two strips of fabric with batting secured inside.
Create the pockets
Now measure 2.5 inches from the right side and make a 1/4 inch pleat and secure with a straight pin. Measure across 2.5 inches from the pleat and mark a vertical seam. You have now outlined the outside pocket. Repeat the pocket making process by measuring 3 inches from the vertical seam, make the pleat and then mark the vertical seam 3 inches from the center pleat. To complete the pocket measurements continue across 2.5 inches, create the center pleat and secure.
Attach the first pocket strip
Pin this pocket strip to the front of the organizer so that the bottom edge of both pieces and the outside edge of the pocket piece line up with the edge of the body of the organizer. To attach the pocket piece to the main body simply sew a straight ¼ inch seam down one outside edge across the bottom and up the other outside edge. To create the individual pockets just sew a straight seam down each of the vertical seam marks.
Attach the second pocket strip
Repeat the pocket process for the second row of pockets. The only difference for this row is that the bottom edge should be placed about 4 inches above the top edge of the lower pocket row. Once the final pocket row has been completed remove all the pleat pins and your crib pocket organizer is nearly ready for use.
Attach your decorations
To make it even more special use peel and stick velcro hook and loop dots to attach decorations to the front of each pocket. Be adventurous!
Fit onto your crib & start using
Your pocket crib organizer is now ready to be put to use. Fasten it securely on the end or side of your crib and fill the pockets with whatever will be most useful to you. Diapers, cloths, clothes, toys, rattles??? What will you use it for? Please let me know.

